
how to use a soldering machine?
2025-10-10 14:31To use a soldering machine, you must be careful and pay attention. Always keep yourself safe before you begin. Burns, chemical exposure, and electrical dangers are common risks:
Follow these steps: get your tools, set up your workspace, solder your pieces, and clean up. You can get good at this with practice and patience.
Key Takeaways
Always think about safety first when using a soldering machine. Wear safety glasses and gloves. Work in a place with
fresh air. This helps you avoid burns and bad fumes.
Pick the right soldering machine for your project. A soldering iron works well for small jobs. A soldering station is better for big tasks.
Get your workspace ready by putting tools in order. Make sure there is good air flow. A clean area helps stop accidents. It also helps you focus better.
Tinning the soldering tip before you use it helps heat move better. It also makes the tip last longer. Clean the tip often while you solder.
Use the right temperature for each solder type. For lead-based solder, set it between 330°C and 370°C. For lead-free solder, use 350°C to 400°C.
Check solder joints closely after you finish. Look for shiny and smooth spots. There should be no cracks or holes. This makes sure the connection is strong.
Practice with easy projects to get better. Start with simple circuits. Try harder tasks as you get more confident.
Clean your workspace after you finish soldering. Put tools away the right way. Throw away waste to keep your area safe and neat.
1. Tools and Materials
Soldering Machine Types
You need to pick the right Soldering Machine for your project. Each type works in its own way and has special uses.
Soldering Iron
This tool is easy to use and can do many jobs. It heats up fast and is good for small fixes.Soldering Station
This Soldering Machine lets you set the temperature you want. It is best for big jobs and professional work. Brands like Xiamen Sipu Mechanical make stations with settings you can change and comfy handles.
Tip: If you are new, use a soldering iron or a simple station. For harder jobs, get a station that lets you change the temperature.
Other machines like hot air rework stations, soldering robots, wave soldering machines, reflow ovens, and ultrasonic soldering machines are for special or big jobs.
Soldering Iron
A soldering iron is light and simple to hold. You can use it for quick repairs and tiny parts. Pick one with a soft grip and tips that fit many jobs. This helps you work on different joints.
Soldering Station
A soldering station has a soldering iron and a control box. You can pick the exact heat you need. This keeps parts safe from too much heat. Many stations have stands and sponges for safety and easy cleaning.
Solder and Flux
It is important to pick the right solder and flux for strong joints. Match the solder to your job and think about how you will clean the flux.
Leaded and Lead-Free
You can choose leaded or lead-free solder. Leaded solder melts at lower heat and makes strong joints. Lead-free solder is better for the earth and follows safety rules. Use thin wire for most electronics. Flux core solder is easy because it has flux inside the wire.
Flux Types
Different fluxes help solder stick to metal. Each kind has good and bad points:
Note: Water soluble flux works great but needs careful cleaning. Rosin flux keeps your work safe but leaves sticky stuff. No-clean flux is easy but may not work for all jobs.
Accessories
You need some extra tools to use your Soldering Machine safely. These help you work cleanly and avoid getting hurt.
Stand
A stand holds your hot soldering iron or station when you are not using it. This stops burns and keeps your area safe.
Sponge or Cleaner
Use a wet sponge or brass cleaner to wipe the tip of your soldering iron. Clean tips heat better and make nicer joints.
Tweezers
Tweezers help you hold tiny parts while you solder. They keep your fingers away from the hot tip.
Cutters
Wire cutters snip off extra wires after you finish soldering. Sharp cutters help your work look neat.
Keep your tools tidy and close by. This helps you work faster and safer with your Soldering Machine.
Safety Gear
When you use a Soldering Machine, you must protect yourself from burns, fumes, and flying solder. Safety gear helps you avoid injuries and keeps your workspace safe. You should always check your gear before you start working.
Below is a table that shows the most important safety gear for soldering. Each item helps you stay safe and healthy while you use your Soldering Machine.
Glasses
You must wear safety glasses every time you use a Soldering Machine. Solder can spit or pop when it heats up. Tiny drops can fly into your eyes and cause serious injury. Glasses with side shields give you extra protection. You should pick glasses that fit well and do not slip off your face. If you wear prescription glasses, you can use safety goggles over them.
Tip: Always check your glasses for cracks or scratches before you start. Damaged glasses do not protect you as well.
Fume Extractor
Soldering creates fumes that can harm your lungs and skin. Leaded and rosin-based solders make more dangerous fumes. You should use a fume extractor to pull these fumes away from your face. A fume extractor sits near your Soldering Machine and uses a fan to suck up smoke and chemicals. You can also open a window or use a small fan to help move air out of your workspace.
Place the fume extractor close to your work area.
Turn it on before you start soldering.
Clean or replace the filter often to keep it working well.
If you do not have a fume extractor, you should use lead-free and rosin-free solder. These types make fewer fumes and lower your health risks.
Note: Good ventilation is key. Never solder in a closed room. Always keep fresh air moving when you use your Soldering Machine.
You must use safety gear every time you work with a Soldering Machine. These steps help you avoid burns, breathing problems, and eye injuries. When you make safety a habit, you can focus on your project and build strong, neat solder joints.
2. Workspace Setup
Setting up your workspace is the first step before you use a soldering machine. A safe and organized area helps you work faster and prevents accidents. Follow these steps to prepare your soldering station.
Organize Tools
You should keep your tools neat and easy to reach. A tidy workspace lowers the risk of mistakes and injuries. Use these tips to organize your area:
Place your soldering machine on a stable, heat-resistant mat.
Arrange your solder, flux, tweezers, cutters, and cleaning sponge in a row.
Keep a fire extinguisher close by and know how to use it.
Store flammable materials far from your work surface.
Avoid clutter and loose wires around your station.
Tip: A clean workspace helps you focus and makes your soldering tasks smoother.
Ventilation
Good ventilation protects you from harmful fumes. Soldering releases smoke that can bother your lungs and eyes. You need to set up airflow before you start.
Check the size of your soldering station and estimate the amount of fumes.
Use a fume extractor with HEPA or activated carbon filters for best results.
Pick a quiet system so you can concentrate.
Choose a compact extractor that fits your workspace.
Make sure the extractor matches your soldering machine model.
Replace filters often to keep the air clean.
Select systems with automatic shut-off and fire-resistant parts.
Open a window or use a fan if you do not have a fume extractor. Never solder in a closed room.
Safety Prep
Safety is the most important part of your setup. You must prepare for fire risks and protect yourself from burns and injuries.
Fire Safety
Keep a fire extinguisher within arm’s reach.
Use a heat-resistant mat under your soldering machine.
Store flammable liquids and papers away from your work area.
Know emergency procedures and how to report accidents.
Protective Gear
Wear safety goggles to shield your eyes from hot solder.
Put on heat-resistant gloves to protect your hands.
Use fire-resistant clothing, such as cotton shirts and pants.
Keep a first aid kit nearby for quick treatment of burns.
Inspect your tools for damage before each session.
Allow your soldering machine and tools to cool down before you store them. Clean the tip after each use to prevent residue buildup.
A well-prepared workspace lets you use a soldering machine safely and efficiently. You reduce risks and make your projects more successful when you follow these steps.
3. Use a Soldering Machine
Power On
You must start by plugging in your Soldering Machine. Check that the power cord is secure and the outlet works. Turn on the machine using the switch or button. Most machines have a light that shows when they are on. Always keep your hands dry when you touch electrical parts. If you use a soldering station, set it on a stable, fire-resistant surface. Never leave your Soldering Machine unattended while it is powered on.
Tip: Double-check that the machine is off before you plug it in. This helps prevent accidental burns.
Heat Up
After you power on, let your Soldering Machine heat up. The tip needs to reach the right temperature for your project. Use the control knob or digital display to set the temperature. Different jobs need different heat levels. The tables below show the ideal temperature ranges for common soldering tasks and solder types:
Set your Soldering Machine to match the job and solder type. Wait until the tip reaches the set temperature. Most machines heat up in less than five minutes. You can test the tip by touching it to solder wire. If the solder melts quickly and smoothly, you are ready to begin.
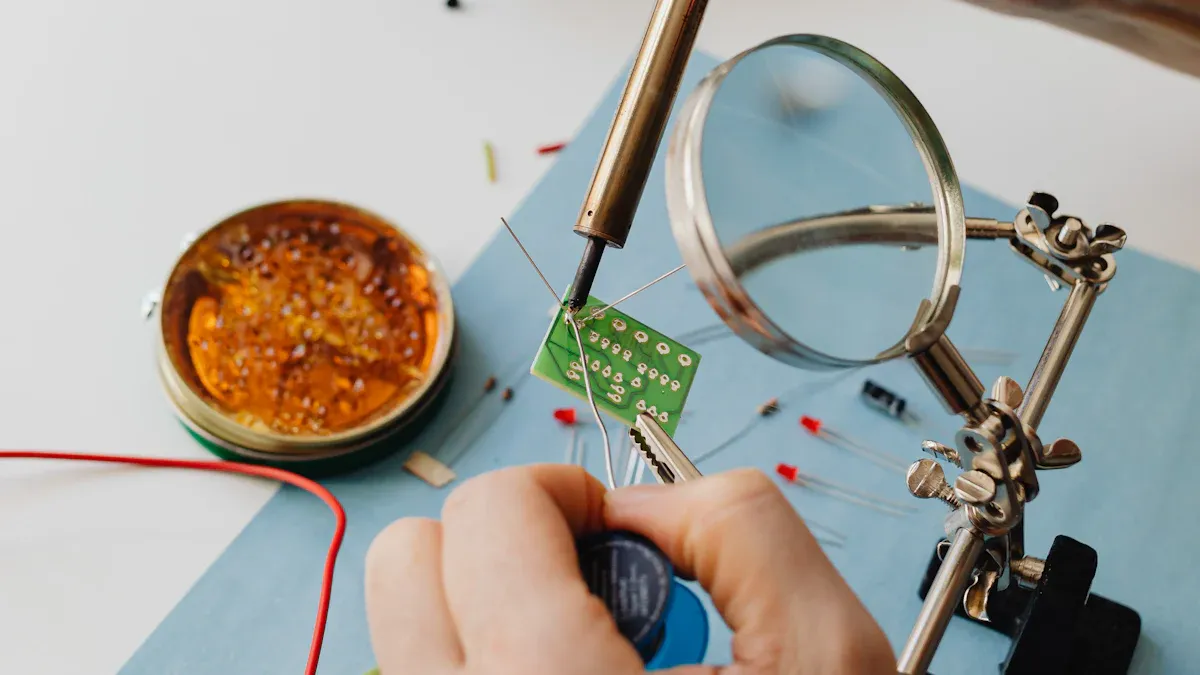
Tinning Tip
Before you use a soldering machine for your project, you need to tin the tip. Tinning means coating the tip with a thin layer of solder. This step helps you get better heat transfer and cleaner joints. Follow these steps to tin your tip:
Wipe the hot tip with a damp sponge or brass cleaner.
Touch the solder wire to the tip until it melts and covers the surface.
Rotate the tip to spread the solder evenly.
A well-tinned tip prevents rust and keeps a protective layer on the iron. It also extends the life of your Soldering Machine’s tip. Tinning improves conductivity and makes soldering faster. You avoid oxidation and contamination, which can lower the quality of your joints.
Tinning also helps to avoid oxidation and contamination of the solder joint, which can affect soldering quality.
If you skip tinning, you may struggle to make strong connections. Always tin the tip before and after you use a soldering machine. This habit keeps your equipment in top shape and helps you get professional results.
Position Components
Getting your parts in the right place is very important. This helps make strong solder joints and keeps your electronics working well. You need to follow some simple steps to get good results with the Soldering Machine. These steps help you get ready before you start soldering.
1. Prepare Your Workspace
Make sure your workspace is clean and bright. Good light helps you see small things and avoid mistakes. Clear away dust and clutter from your table. Put your Soldering Machine on a flat, steady spot. Place your tools where you can grab them fast.
Tip: Bright lights help your eyes and let you see if parts are not lined up.
2. Inspect the PCB and Components
Look at your printed circuit board (PCB) for any dirt or damage. Check that all the pads are clean and not rusty. Make sure your parts are the right ones for your project.
3. Align Components Accurately
Here are some tips for lining up your parts:
Leave a small gap of 0.1 to 0.2 mm around each pad. This stops the solder from spreading too much and keeps your joints neat.
Use at least two special marks on the PCB. These marks help you put parts in the right place.
Keep at least 5 mm of space around the edge of the PCB. This makes it easier to hold and keeps parts safe from damage.
4. Insert and Secure Leads
Push the leads of your parts through the holes in the PCB. Make sure each part sits flat on the board. If a part moves, use tweezers or a holder to keep it still.
For surface-mount parts, use tweezers to put them on the pads.
For through-hole parts, bend the leads a little under the board to hold them.
5. Clean Contact Surfaces
Put flux on the pads and leads. Flux cleans off rust and helps the solder flow better. Use a small brush or a flux pen to spread it evenly.
Note: Clean pads and leads help the Soldering Machine make strong joints.
6. Position for Soldering
Set up the PCB so you can reach every joint. Use a PCB holder or helping hands to keep it steady. Make sure your parts do not move while you solder.
7. Final Checks Before Soldering
Look over your work before you start. Make sure all parts are lined up and held tight. Check that your Soldering Machine is hot enough. Put on your safety gear.
If you follow these steps, you will do well with your Soldering Machine. Careful setup gives you strong, tidy solder joints and electronics that work well.
4. Soldering Steps
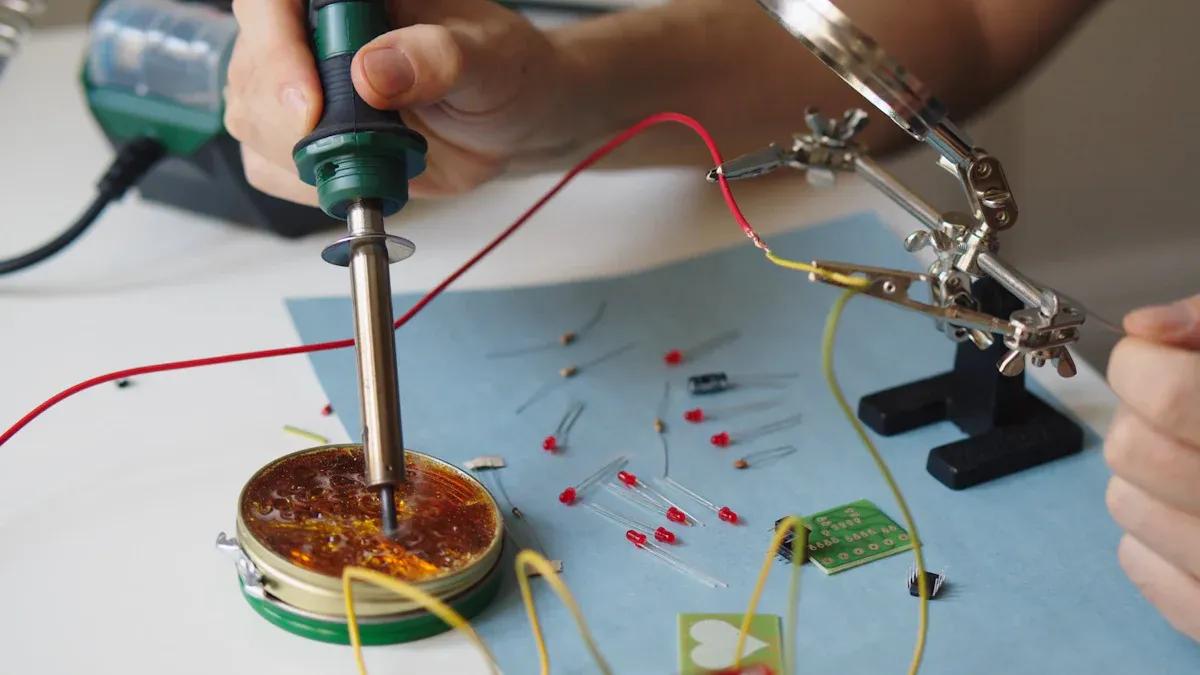
Heat Joint
You start by heating the joint where you want to make the connection. Place the tip of your Soldering Machine on both the pad and the lead at the same time. This step helps the solder flow evenly and creates a strong bond. Hold the tip in place for four to six seconds. Do not rush this step. If you remove the tip too soon, the joint will not get hot enough. If you leave it too long, you may damage the board or the part.
Tip: Always keep the tip clean and tinned. A dirty tip will not transfer heat well.
You should use the right temperature for your solder type. For most electronics, set your Soldering Machine between 330°C and 370°C for lead-based solder, or 350°C to 400°C for lead-free solder. Make sure the joint heats up evenly. If you see the pad lift or the part discolor, you are using too much heat.
Apply Solder
Once the joint is hot, touch the solder wire to the joint, not the tip. The heat from the joint melts the solder and pulls it into the connection. Use just enough solder to cover the pad and the lead. Too much solder can cause bridges or weak joints. Too little solder will not hold the part in place.
Here is a table showing the most effective solder types for different jobs:
Use lead-free solder for most electronics. SAC305 is a popular choice for its strength and reliability.
You should keep the soldering tip on the joint only as long as needed. Remove the tip once the solder flows smoothly and forms a shiny, cone-shaped joint. If the solder looks dull or grainy, you may have overheated the joint.
Cool Down
After you apply the solder, let the joint cool naturally. Do not blow on it or move the part. Controlled cooling helps the joint stay strong and prevents cracks. For lead-free solder, aim for a cooling rate of 2°C to 4°C per second. This rate protects the joint from thermal stress and keeps your components safe.
Proper cooling makes solder joints stronger.
Controlled cooling prevents damage to parts.
Do not touch or adjust the joint until it is fully set.
Allow the joint to cool before you inspect or clean it. Rushing this step can weaken your work.
When you use a soldering machine, following these steps helps you create reliable connections. You get better results when you heat the joint properly, use the right solder, and let the joint cool at the correct rate.
Inspect Joint
After you finish soldering with your Soldering Machine, you need to inspect each joint to make sure your work is strong and reliable. Careful inspection helps you catch mistakes early and avoid problems in your electronics.
Here are the main ways you can inspect your solder joints:
For most home or beginner projects, you will use visual inspection. You can use a magnifying glass to see small details.
What should you look for in a good solder joint?
The solder should wet and spread smoothly over the pad and lead.
You should see a shiny, cone-shaped joint with no cracks or holes.
The joint should not have too much or too little solder.
The solder should form a strong metallurgical link between the part and the pad.
There should be no bridges (unwanted connections) between pads.
Checklist for inspecting your solder joints:
Look for a shiny, smooth surface.
Check that the solder covers both the pad and the lead.
Make sure there are no gaps, cracks, or holes.
Confirm that the joint is not dull or grainy.
Ensure there are no solder bridges between pads.
If you find a problem, you can reheat the joint with your Soldering Machine and add a small amount of solder or flux to fix it.
Clean Tip
Cleaning the tip of your Soldering Machine is a key step for every soldering session. A clean tip gives you better heat transfer and helps you make strong, neat joints. If you skip this step, your Soldering Machine may not work well, and your joints may fail.
Follow these steps to clean your soldering tip:
Wipe the hot tip on a damp sponge to remove oxides and old solder.
Use brass wool for a deeper clean without damaging the tip.
Apply a little flux core solder to the tip after cleaning to protect it from oxidation.
For heavy oxidation, use tip tinners or cleaning paste as needed.
Tips for keeping your Soldering Machine tip in top shape:
Clean the tip regularly during your soldering session.
Avoid using sandpaper or files, which can damage the tip.
Always coat the tip with fresh solder before turning off your Soldering Machine. This step prevents oxidation and extends the tip’s life.
A well-maintained tip helps you get the best results from your Soldering Machine and makes every project easier.
5. Finish and Troubleshoot
Clean Up
Cleaning up after soldering keeps your area safe and your tools working longer. First, turn off your Soldering Machine and unplug it. Wait for the tip to cool before you touch or clean it. Put on safety goggles to keep your eyes safe from splashes. Use a fan to blow away any leftover fumes.
Here are ways to clean your soldering tips based on what kind of tip you have and how dirty it is:
Wipe the tip with a damp sponge or brass wool while you work and after you finish.
Put a little solder on the tip before you put it away. This stops rust.
Clean up any spilled solder or flux with isopropyl alcohol.
Throw away old solder and used flux in a safe way.
If you clean your tools often and gently, your Soldering Machine will last longer. Do not use rough cleaning tools, as they can hurt the tip.
Always make sure all capacitors are empty and the power is off before you start cleaning up.
Store Safely
Storing your tools the right way keeps you and your equipment safe. Always put your Soldering Machine in its stand when you are not using it. Never leave a hot iron on the table. Make sure your work area does not have anything that can catch fire.
Check the soldering iron and cord for any damage before you put them away.
Wrap the cord loosely so it does not get worn out.
Keep tips and extra parts in a dry, clean box.
Keep your workspace neat and free from mess.
Wear safety glasses and a lab coat when you handle or store your tools. Always hold the soldering iron by the insulated handle.
A tidy storage space helps stop accidents and keeps your tools ready for next time.
Avoid Mistakes
There are many mistakes you can make when using a soldering machine. Knowing about these mistakes helps you avoid them and make strong, neat joints.
Look at your solder joints to see if they are shiny and smooth.
Do not use too much or too little solder.
Never pull on parts while the solder is still cooling.
Clean the pad and lead before you solder for better results.
Paying close attention to these steps helps you get great results every time you use a soldering machine.
Fix Issues
When you use a Soldering Machine, you may encounter poor solder joints or weak electrical connections. Fixing these problems helps your project work reliably and look professional. Follow these steps to troubleshoot and repair common soldering issues:
Clean the Solder Joint Area
Wipe the joint with isopropyl alcohol. This removes dirt, grease, and old flux. Clean surfaces help new solder stick better.Remove Old or Excess Solder
Use a solder wick or a solder sucker to take away dry or extra solder. Removing old solder gives you a fresh start and prevents bridges between pads.Apply Flux
Put a small amount of flux on the joint. Flux helps the solder flow and bond to the metal. It also cleans away oxidation.Reheat the Solder Joint
Place the tip of your Soldering Machine on the pad and pin. Heat both parts evenly for a few seconds. Do not leave the tip on too long, or you may damage the board.Add New Solder
Feed fresh solder to the heated joint. Use just enough to cover the pad and pin. A shiny, cone-shaped joint shows good bonding.Inspect the Solder Joint Again
Check the joint with your eyes or a magnifier. Look for a smooth, shiny surface that covers the pad and pin. If you see cracks, holes, or dull spots, repeat the steps above.
If you see too much solder, use a desoldering braid or pump to remove it. Always apply fresh flux before reheating and resoldering.
Common Problems and Quick Fixes Table
You can fix most soldering mistakes with patience and the right tools. Always use your Soldering Machine at the correct temperature. Clean and inspect each joint before moving to the next step. Strong, neat solder joints keep your electronics safe and reliable.
To use a soldering machine the right way, follow these steps: First, set up your workspace and get all your tools ready. Next, stay safe by wearing safety gear and making sure air can move in the room. Try practicing on easy circuits or kits to help you learn. After you finish, check your solder joints and clean your tools. You can learn more by looking at guides from NASA, watching YouTube videos, or joining online groups.
Keep practicing, take care of your tools, and begin with simple projects. This will help you get better and make strong, safe connections.
FAQ
What temperature should you set on a Soldering Machine?
You should set your Soldering Machine between 330°C and 370°C for lead-based solder. For lead-free solder, use 350°C to 400°C. Always check the solder type before you start.
How do you clean the tip of a Soldering Machine?
Wipe the hot tip on a damp sponge or use brass wool. Clean the tip often during your work. This helps your Soldering Machine make strong, neat joints.
Can you use a Soldering Machine on all types of electronics?
You can use a Soldering Machine for most electronics, including circuit boards and wires. For sensitive or tiny parts, choose a fine-tip iron and lower heat.
What safety gear do you need when using a Soldering Machine?
You need safety glasses, heat-resistant gloves, and fire-resistant clothing. Use a fume extractor or work in a well-ventilated area to avoid breathing harmful fumes.
Why does solder not stick when you use a Soldering Machine?
Dirty pads, old flux, or low heat can stop solder from sticking. Clean the surfaces, add fresh flux, and make sure your Soldering Machine is hot enough.
How do you fix a cold solder joint with a Soldering Machine?
Reheat the joint with your Soldering Machine. Add a little flux and fresh solder. Wait for the joint to cool before you touch it.
What should you do if you see a solder bridge?
Remove extra solder with a solder wick or pump. Clean the area and use your Soldering Machine to reheat and fix the joint. Always check for bridges before finishing your project.